The Third Dimension and Beyond?

In this installment, you will be creating an animation on a 3D surface. This project will demonstrate a different way to manipulate the Front and Back Edge “sizes” of a 3D Text object, using Multiple materials, create animated “textures”, touch on specular images for the custom “finish”,  using a custom bump map, and animating the environment to achieve an interesting special lighting effect.

finished_look

This project (requires Motion 5.2.x) is only going to use one text character, four behaviors, one generator, one shape and an emitter, so go ahead and launch Motion and start a new Motion Project (1920 x 1080). Click on the Camera icon at the bottom right of the canvas to create a 3D project. Doing so first before you add anything else avoids the Switch to 3D dialog prompt.

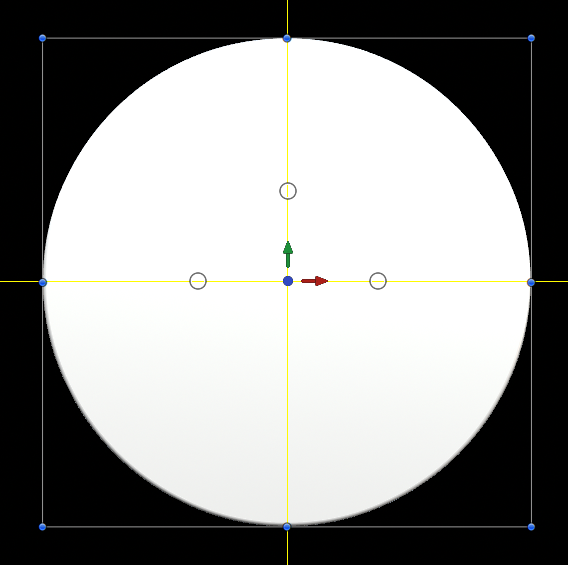
 Click on the ’T’ icon at the bottom of the Layers column and click in the canvas, type option-8 (the bullet character). In the Text inspector, the Format tab, select Soap as the font (it’s available to all users of Motion and FCPX). Set the Size to 1500. That is not a misprint: 1500. Set the text Alignment to center. Go to the Properties tab and reset everything (Image). If rulers are not on, type Command-Shift-R to show rulers or go to the View dropdown menu and select Show Overlays > Rulers from the upper right corner of the Motion window. Click on the left ruler and drag out a vertical guide to the zero point (center) of the canvas (you’ll see feedback with the mouse); then click on the top ruler and drag another, horizontal guide down to the center. If you have trouble attaining the zero marks, zoom in on the canvas a little and try dragging the existing guide line again.

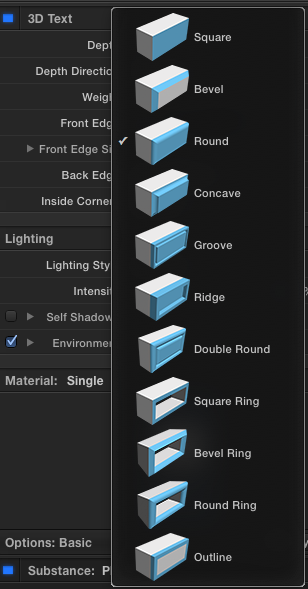
This next part is really very cool. When you change from 2D to 3D text, Motion shows you a trimmed (minimum) bounding box for the character! It makes setting up a center alignment quite easy, so click on the Appearance tab and turn on 3D Text, then go back into the Format tab and in the Advanced section, change the Offset > X parameter to -8 and the Offset > Y parameter to -467. You should see something like this:

(If your character Size is anything other than 1500, you’ll have to adjust Offset X and Y to line up to the guides—the values will be different.)

Do you see how the bounding box fits the character? And the blue dots make excellent guides for aligning to the canvas guides you set up at the center. This is a very good workflow practice in “model building,” but since this is the only character in use today, it’s just a point being made and its importance may be lost. Moving on…

Motion provides these shaping “tools” for the edges of the extrusions in 3D:

You are allowed to set the “width” of the shape and how far the “depth” of the edge “distortion” is carried out (relative to the extrusion Depth you set at the top). You are invited to play with all of these shapes (and the Width/Depth parameters) to see how they behave, but do it on your own time. Today, I want you to set the Front Edge to Round and the Back Edge to Round Ring (leave the Size parameters at their default). Next, you need to go into the Properties inspector to the Timing panel — click on Show to reveal the In/Out/Duration parameters if they are not visible. Increase the Duration (or Out) of the object (text character) by about 5 or more frames (the importance will become apparent shortly).

To assist in viewing the rest of these steps, select the parent Group and go into Properties. Set the Position Z parameter to -2500 and the Rotation X parameter to 115. Reselect the text object.

Next, go to Behaviors > Text Animation and select Sequence Text. In the Behaviors inspector (Sequence Text should already be showing) click on Parameter: Add and select 3D > Front Edge Size and Add > 3D > Back Edge Size. Now for the trick that will stop this from animating over the course of our project: go down to Start Offset and select 1 or more frames beyond the length of the project. If your project is 10 seconds long (300 frames), set this value to 301 or more (up to the Timing Duration you just set). [You should try leaving this at 0 and seeing what happens when you play the project… but do it later.]

Dial down the disclosure triangle for Front Edge Size and Back Edge Size (remember you set the shapes in the Appearance tab). Set the Depth values to about 600 (give or take… you can make adjustments later). Set the Front Edge Width to -250. You should get a nice “foot”. Now, set the Back Edge Size to -365. 

Go back into the Appearance tab and set the Material to Multiple. Click on the Front material swatch then click on the chain icon at the bottom of the Back swatch. That will link the properties of the two together. Select Substance: Generic and set the Opacity to 0%.

If this is what you see, you’re right on track.

In the Layers List column, add a New Group (right click in a blank area and select from the popup menu or click the + at the bottom left corner of the layers list). In the Group inspector, set 2D and check Fixed Resolution. You should (almost) always do this for anything you use as a texture in Motion 3D text.  (The alternative that sometimes works is to select the 3D and Flatten options… it will depend on the effect you’re going for and more often than not, you’ll need to switch to the 2D Fixed Resolution if it’s not working as expected.)

Add: Generators > Sunburst.

Set the Sun Color to a blue/cyan shade (R: 0.2; G: 0.5; B: 1.0) and the Background Opacity should be 0%. Set the Number of Arms to about 40 or so, the Radius to 1800 and the Inner Radius to 0.05. Set the Contrast to 25%. Turn off (uncheck) the parent Group (which you should probably rename “texture”).

Select the bullet character again and in the Appearance tab, Select Material Front Edge and chain link Side and Back Edge together. In the Substance section, select Surface: Image (if you don’t have the Surface option available, the substance isn’t “Generic”). In the Image Options that appear, drag the Group of the Sunburst Texture and drop it in the Image well. Dial down the Placement option and dial down the Scale option. Uncheck “Scale with Font Size.” You’ll see the Scale values jump up to over 1000%. Drag the Scale value back down to 100% (or 101% or anything that’s close). Whatever value you end with, you’ll reuse it in the upcoming steps.

Your model should now look something like:

Next: Find the Options: Basic line under the Material section and Add Layer > Finish > Custom Specular. Set Shininess to 20% and the Surface Blend to about 80%. Dial down the Intensity Image and drag the Sunburst texture Group into the Image well. Set the White Level to 14.0 and repeat what you did above with the Placement options (dial down Scale, uncheck Scale with Font Size, set Scale to 100% — the exact same value as above — type it in if you have to).

You could stop there, but there’s one more level that adds a little more 3D-ness to the effect. Options: Basic > Add Layer > Distress > Custom Bumps. Repeat the steps for the texture in the last two sections. Set the Bump Map gain to about 500%.

Select the bullet character’s parent group and rotate the image on Properties > Rotation > Z about -45°.

And now we’ll add the “lights”.

Select the Sunburst generator (this will put your “next action” inside the correct group). Then select the Circle tool. Draw a circle (holding down the shift key) with a radius of about 100 in the Canvas near the center, Fill Color: white and Feather of about -25. Type the ‘E’ key to create an emitter from the object. In the Emitter controls, select 3D and set the Emission Longitude to 0. Set the Birth Rate to about 150 or so, Initial Number to 100, Speed to about 600, Speed Randomness to about 300; Color Mode to Over Life and set up the gradient to be something like this:

It can be anything you want color-wise, but the opacity over life will look better set up similarly to the above illustration.

Set the Cell Controls Scale to about 20 and Scale Randomness to about 50. (If you turned on the textures group to see what you were working on, turn it back off!)

[left image: view of texture group — right image: view in “model”]


One last step!

Go back to the bullet character Appearance tab and dial down the Lighting > Environment disclosure triangle. Set the Type to Colorful. Dial down the Rotation disclosure triangle and right click on X and Add Parameter Behavior > Rate. In the Rate inspector, set the Rate value to 24. Do the same for Y and for Z, Add Parameter Behavior > Oscillate (leave it at default values).

Let ‘er rip!

Now: turn off the Sunburst Generator 😀

Afterthoughts:

The state of “real 3D” in Motion is not perfect, even this project will illustrate that. If you rotate the object around the X-axis you will notice that the “plane” that has its opacity set to 0% (Round Ring/Back face) leaves a telltale sign of a “cut” through the object in the center core; and the way textures are applied are an “expedience” (the texture is mapped in quarters, every other quarter is reversed and the edges are “blended” together — if you look closely of the sunburst version, you’ll see four focal points, how they extend, and how they are ultimately blended — it’s not always pretty but works well here). Even if you turn off texture wrapping (Wrap: None) you still get the blending “trick”—so, four repeats, no matter what. There are some workarounds, and I’ll get to those eventually… and there are a few other gotcha issues as well; hopefully Apple will address these issues in future updates although they are not compelled to do so because the nature of our use of Motion is outside the currently intended design of the software. Still, there are an amazing amount of possibilities available with Motion’s new 3D features and it all still works just like Motion always has making it one of the easiest applications to use to create “real 3D” effects. Consider:

—F•X