Originally published on fcp.co
Peter Wiggins wrote:
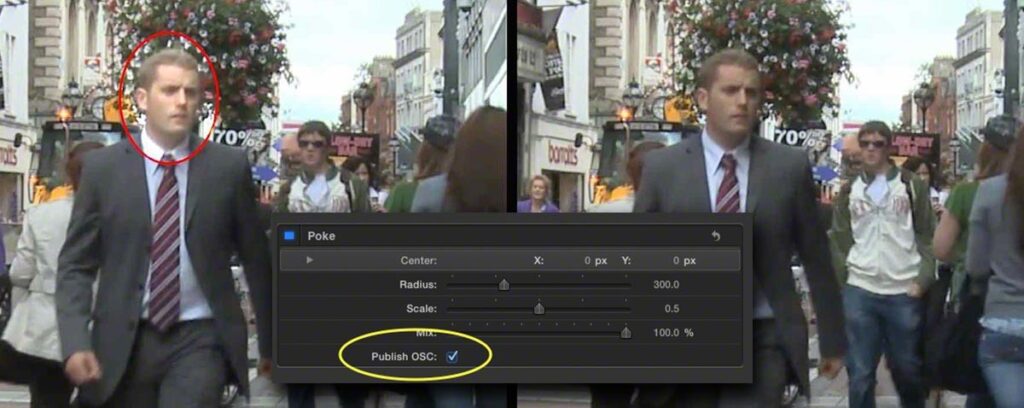
We have all used the On Screen Controls in Final Cut Pro X to control plugins- but how are they built? In this first part of a series of articles, Fox Mahoney takes a look at how OSCs work and how to incorporate them into effects.
We have had many requests for our Motion expert Fox, to dig deep into OSCs in Motion/FCPX. It’s s very deep and complicated subject, so we have decided to split the tutorials into parts. Here is his part one.
OnScreen Controls in Motion
Motion does an outstanding job of creating a consistent “universe” so creating templates using onscreen controls should be a no-brainer, right? You’d think! Turns out, there’s more going on than meets the eye and this article will attempt to shed a light on the mechanics of it all. The best way to learn this information is to see it in action and I will attempt to explain the whys and wherefores afterwards.
Start a new Title project. The reason for using a Title over an Effect is that this type of effect doesn’t always need to occupy an entire clip and you don’t want to have to cut a clip if you don’t have to. All you have to do with a title is position the playhead where you want it to start and double click on the title to place it, then trim it to fit what you need. It can even cross over clip edit boundaries.
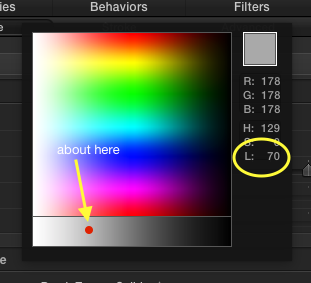
Draw a vertical oval in the Canvas. Set the Outline Brush Color to Red. Fill the oval with 70% gray. Right click on the Fill Color swatch and drag the mouse to about the region highlighted below and watch the L value until it hits 70.
Go to Properties > Blending and set the Blend Mode to Vivid Light.
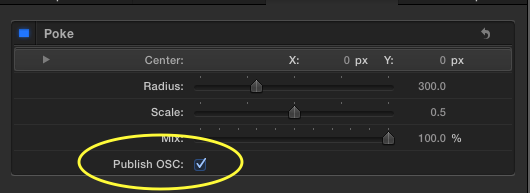
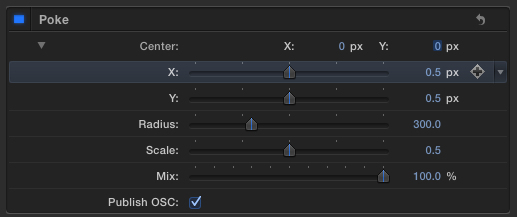
Select the Group layer and create a New Group (command-shift-G or click the + at the bottom of the Layers List column). Name the Group “OSC.” In the group inspector, select Type: 2D and check Fixed Resolution. Add a Filters > Distortion > Poke filter to the group. In the inspector, check Publish OSC.
All we have left to do is link up the on screen control with our shape and we should be ready to try out this effect in FCPX. You must follow all these instructions exactly. Explanations later. Start by adding a shape to the group and turning off its visibility (uncheck the layer).
Select the oval shape object in the Layers List and go to Properties > Transform and dial down the disclosure triangle on the Position parameter (if it’s not already open). Right-click on the X parameter and Add Parameter Behavior > Link. Motion will switch you to the Link behavior inspector. Go back to the Properties tab and right click on the Position > Y parameter and Add Parameter Behavior > Link.
Now when Motion switches you over you can handle both at the same time. In both Source Object source wells, drag and drop your OSC group. Right underneath the Source Object well is a parameter labelled Source Parameter. Click the Compatible Parameters drop down menu and for the Y parameter (which will be the top Link) select Filters.Poke.Center.Y. Your oval shape should rapidly disappear (or move to the top edge of the canvas). Don’t worry. For the X Link > Source Parameter > Compatible Parameters, select Filters.Poke.Center.X.
For each Link (X & Y) go to the Bottom line which will read “Y offset” and “X offset” respectively. For both parameters, set the offsets to -0.5.
One last step: select the OSC group and pick a shape (rectangle, oval, line) and draw anything in the canvas. Then uncheck the layer to turn it off. (Again: explanations later.)
Save your Title project (something like Highlight Spot) to a convenient category for FCPX and switch to FCPX to try it out. Place the title on the storyline and if you’ve done everything correctly so far, you should 1) see the OSC in the viewer and 2) be able to click and drag the oval shape around the screen.
If everything is working up to this point, go back into Motion and publish the following parameters:
Poke filter: Center parameter
Circle shape > Geometry: Radius
Circle shape > Geometry: Curvature (you might want to use a rounded rectangle as an option)
Circle shape > Properties > Blending: Opacity
Circle shape > Properties > Blending: Blend Mode (optional – you might want to try different effects)
Circle shape > Style > Fill > Fill Color
Circle shape > Style > Outline > Brush Color
Circle shape > Style > Outline > Width
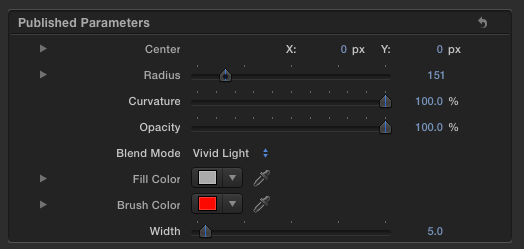
All of these parameters, except the Blend Mode, can be keyframed in FCPX.
Here’s our Highlight Spot title in action in FCPX. You can see how the Vivid Light blend mode lightens and clarifies our target without muddying the look with a fill color opacity. You can change that look in FCPX with the published Fill Color and Blend Mode parameters, if you like.
And now for the whys and wherefores…
By themselves, filters have no length in time and no position. They exist as long as the object they are applied to exists and they are positioned with that same object. If a filter is applied to a group, then the filter acts on all the objects in the group and its center changes with the dimensions of the group.
An empty group, by default is either 2D or 3D (converted if you add a Camera or manually switch to a 3D group either by typing Control-D or clicking the small stack icon on the right side in the Layers List).

An empty group has zero dimension and zero time. An empty group is infinitely small. A group with a filter applied still has zero dimension, zero time and is infinitely small. A group with Fixed Resolution has the dimension of the fixed width and height parameters provided or by default, they are set to the same dimensions as your project. It is possible to do very interesting things by manually setting the dimensions of Fixed Resolution groups, like creating a “HUD” type control with multiple OSCs neatly contained and another OSC to move it around the screen. A project for later…
A group with an OSC filter with zero length time will not appear in FCPX even though the OSC is present for the entire Motion project. The “fast” way to add time to a group is to add a bonafide object and one of the easiest is a shape. The alternative to this method is to select the OSC group and in the Properties inspector > Timing (click on Show to reveal its parameters) manually set the duration to the project length (or longer).
You cannot link mismatched parameters.
Linking an OSC filter’s Center X and Y parameters require separate links. The filter is not an object and as explained it has no position of its own. The Center X&Y values however are numerical and they can be used to link to any other numerical value but they cannot be used together to link to the Position parameters of an object — they are not “like” parameters. If you dial down the disclosure triangle on the Center parameter, the true values are revealed. They are 0.5, 0.5 and correspond to the center of the current parent group (if 2D Fixed Resolution) or the project size.
The underlying coordinate system of filter OSCs is from 0 to 1.0 inclusive no matter that the dimensions of the parent group or project may be. The origin (0,0) is the bottom left corner of the canvas (by default). Motion manages the coordinate translations for the most part, but in this case, this is the reason for forcing Fixed Resolution to the size of the project. The center of its dimensional orientation is (0.5, 0.5) and this is the reason for setting the Offset values to -0.5 in the Link behaviors. You need to subtract the 0.5 to bring the object under control back into alignment with the filter OSC and back to center alignment. I sincerely hope that this explanation is clear. If not, just realize that there is a specific workflow to employ to implement an OSC.
One word or warning: if you attempt to Link a filter OSC to an object without Fixed Resolution, as soon as you attempt to move the OSC in the canvas, your object disappears to the “outer regions of the galaxy.” Try it just for grins 😀 [If the group is infinitely small, then 1 pixel movement would correspond to an exponentially larger translation in coordinates than the dimensions of your project!]
In the next part, we will take another step into the weird world of OSCs when we will apply OSCs to control the points of a shape.
For those of you who want to jump in head first, one last bit of information for this introduction: Text is always on top in Final Cut Pro. If you try to apply an OSC to set of objects containing a Text object and the text object is directly over the OSC, you will never be able to grab the OSC in FCPX. To get around that, set one of the Link offsets to slightly more or less than 0.5 to offset the control from the text object’s bounds (you can also delete the text in the viewer, move the object with the OSC, then reapply the text again afterwards).